
And you get four items out of 2 skeins of 100purewool worsted merino. Now that is a lovely way to spend $30.


 It is a reversible tote bag with a cross tie top. I am quite in love with the design that was inspired by a tote a friend just bought. I also made a number of drawstring bags to go with it for the recipients many pairs of dance shoes.

Materials
About 25g of yarn
DPNs of the appropriate size: DK yarn 4mm
Worsted 5mm
Bulky 6mm
Darning needle
Tape measure
Gauge is 22/16/12 sts / 10 cm for DK/Worsted/Bulky yarns.
Pattern
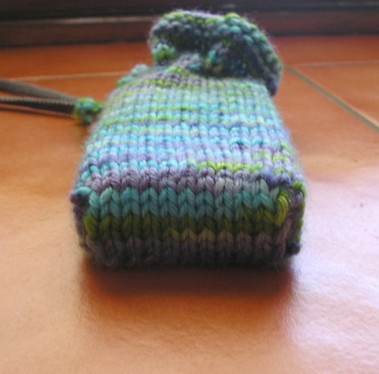
All the calculations here are for worsted weight yarn, for DK yarn, wherever it says to multiply by 16 instead multiply by 22. Similarly if you wanted to use bulky yarn multiply by 12. All measurements are in cm. The calculations for my case are for a Canon A550.
CO the circumference/10 x 16 + 4 sts. Make sure that this number is divisible by 3, round up if necessary. My case was a 36 st cast on.
 Round 1: Knit
Round 2: Purl
Round 3: Knit
Round 4: Purl
Knit rounds until work measures 4 cm.
Eyelet round: *K1, YO,
Knit rounds until the work measures the Length of camera + depth of camera from the eyelet round. (12 cm in my case)
Calculate for Decreases.
Calculate Height / 10 x 16 sts (side a)
Calculate side b as (total stitches – (side a x 2) – 4) divided by 2
Example for my version side a = 6cm / 10 x 16 = 10 sts (rounded up)
Side b = (36 sts – 20 sts – 4 sts) = 12 stitches / 2 = 6 sts
Decreases:
Round 1: ssk, k side a -4 sts (6sts in my case), k2tog, k1, ssk, k side b – 4 sts (2sts in my case), k2tog, k1, ssk, k side a -4 sts (6sts in my case), k2tog, k1, ssk, k side b – 4 sts (2sts in my case), k2tog, k
Next Round: As above but with 2 less stitches between ssk and k2tog – in my case : ssk, k4, k2tog, k1, ssk, k2tog, k1, ssk, k4, k2tog, k1, ssk, k2tog, k1
Continue until there are only two stitches on the shortest side of your base. Graft remaining stitches across the bottom.
Weave in ends.
Thread i-cord, ribbon or just about anything through the eyelets.

Modifications thanks to Sam!
Sam used this pattern to make this camera case but did it slightly differently!
Sam used a provisional cast on and worked from the base up. To do this calculate the total number of stitches you would need to cast on if you were doing it the original way. Use the calculations for the decreases as per the original pattern. provisionally cast on the side a number of stitches, knit double the number of rows as stitches calculated for side b and then pick up the correct number of side b stitches as you carry on in the round. Hope that make sense. if it doesn't just do it top down!
This pattern (and modifications) are provided free for your own personal use. You may knit it for yourself, as a gift, a swap or for charity. This pattern is not intended for commercial use. Any intended commercial use requires permission in writing.


The last item of show and tell is the amazing Gingerbread house that my Brother's partner Patricia put together. She has done these before for us (she assures us that it is essential due to her German heritage) but had declared that she did not have time this year. The German side got the better of her and apparently she put this together Christmas Eve. She then carried it on the tram and train for two hours. Now that is dedication!

The gifts that I made went over well. Sam and Tania told me they loved their project bags and I must confess to being pretty happy myself with how they turned out.

Oh well.....


 Step 4: Press open the sides of the top opening level with the seam. Once you have done this, press under the cut edge to make a neat folded hem around the armhole.


 Step 11: Tie the ribbons at the shoulders and voila!
 This pattern is provided free for your own personal use. You may knit it for yourself, as a gift, a swap or for charity. This pattern is not intended for commercial use. Any intended commercial use requires permission in writing.
 About 50g Worsted Weight Yarn
6mm DPNS
Darning Needle
Gauge: 16sts/10cm
Finished circumference: approximately 44cm
Co 72
Join in the round
Rounds 1 -4: 2x2 rib
Round 5: Knit all stitches
Round 6: Knit to 4 sts before the end of the last needle, turn
Round 7: Sl1 purl to 4 sts before end of first needle, turn
Round 8: Sl1, Knit to 2 sts before last turn, turn
Round 9: Sl1, purl to 2 sts before last turn, turn
Round 10: Sl1, Knit to 3 sts before the end of the last needle, turn
turn
Round 11: Sl1 purl to 3 sts before end of first needle, turn
Round 12: Sl1, K to end of round, turn
Round 13: Sl1, P to end of round, turn
Rounds 14 – 15: Knit all stitches.
Rounds 16 - 19: 2x2 rib
BO loosely
Weave in ends
A wider ear warmer is easily achieved by adding more short rows in between rows 9 and 10. An adult warmer would require a larger number of cast on stitches (I would say about 100). having said that, this one fits me but is quite stretched and a little tight.
 How beautiful are they? I confess that I was secretly hoping that Sam would give me handknit socks for Christmas (is that selfish given I know how much work goes into them) and she did! These are just divine. The pattern is waving lace and the yarn is Lorna's Laces "Vera". I feel so spoilt with yet another pair of hand knit socks. A girl could get addicted. Of course then Sam would never be lost for a gift.....
 There is an Unoriginal Hat from the lovely Yarn Harlot knit in Cleckheaton Vintage Hues. I had to add a few extra cables in to compensate for the lighter yarn and I also did an extra repeat of the whole pattern for the same reason. I have never used this yarn before and I have to say that I quite taken, I love the look that it has created. Here is a close up of the cables. I will probably be lynched by the yarn snobs for saying it, but the look of the yarn knit up puts me to mind of the Noro yarns.
 The scarf is the Reversible Cable Scarf by Mary-Heather Cogar. Such a wonderfully clever pattern. Something I would never have thought of doing. Again I love the way that it has accented the colours in the yarn. I am very pleased.

 width of your scarf when folded)

The Pattern
300g worsted weight yarn for a generous size 1 jacket (I used Cleckheaton Merino Supreme for the prototype which is now out of production, chose any of the gorgeous worsted weights around)
4 stitch markers
5mm 80cm circular
5mm DPNs
5mm crochet hook
Waste yarn
Button
Darning needle
Gauge: 16 sts / 10cm
Glossary
pm – place marker
kfb – knit front and back
slm – slip marker
yo – yarn over
Finished Size
Length minus ruffle - 26cm
Chest - 30cm
Underarm - 10cm
Body
CO 36 stitches using the circular needle.
Row 1: kfb, kfb, pm, kfb, k4, kfb, pm, kfb, k18, kfb, pm, kfb, k4, kfb, pm, kfb, kfb
You have now created the right front, right sleeve, back, left sleeve and left front between the markers.
 Row 2: knit across
Row 3: kfb, k2, kfb, slm, kfb, k6, kfb, slm, kfb, k20, kfb, slm, kfb, k6, kfb, slm, kfb, k2, kfb
Row 4: knit across
Row 5: kfb, knit to stitch before next marker, kfb, slm , kfb, knit to stitch before next marker, kfb, slm, , kfb, knit to stitch before next marker, kfb, slm, , kfb, knit to stitch before next marker, kfb, slm, kfb, knit to last stitch, kfb.
Row 6: k4, purl to 4 stitches before end, k4
Continue repeating rows 5 and 6 until the two front sections each have 18 stitches
Row 7: knit to stitch before next marker, kfb, slm , kfb, knit to stitch before next marker, kfb, slm, , kfb, knit to stitch before next marker, kfb, slm, , kfb, knit to stitch before next marker, kfb, slm, kfb, knit to end
 Row 8: k4, purl to 4 stitches before end, k4
Repeat rows 7 and 8 until there are 52 stitches between the middle two markers (the back of the jacket).
Create the sleeves: k to first marker, place the sleeve stitches onto waste yarn, knit back stitches, place the other sleeve stitches onto waste yarn, knit to end
Next row: k4, purl to 4 stitches before end, k4
The body:
Row 1: knit all stitches
Row 2: k4, purl to 4 stitches before end, k4
Continue repeating rows 1 and 2 until you have reached your desired length (12cm from underarm or so).
Bottom Ruffle:
Ruffle increase row: kfb on every stitch
Purl next row
Repeat ruffle increase row
Purl next row
BO loosely
Sleeves
Evenly space the sleeve stitches on 3 DPNs.
With the right side facing, locate the centre bottom of the sleeve opening. Pick up two stitches from the left of the opening and continue knitting the round, picking up two additional stitches onto needle 3 (42 stitches total)
Knit 2 more rounds
Decrease Round: k1, k2tog, knit to last 3 stitches, ssk, k1
Decrease every 4th round a further 5 times (30 sts)
Knit next round
Ruffle increase round: kfb on every stitch
Knit next round
If you want a fuller ruffle like the bottom of the jacket:
Repeat ruffle increase round
Knit 2 rounds
BO loosely
Finishing
Crochet a button loop on the right front of the jacket and attach a button to the left.
Sew in ends.
About the Stripes.....
The stripes are merely an artifact of not having enough of either coloured yarn. For the record they are 20 row repeats on this one.
This pattern is provided free for your own personal use. You may knit it for yourself, as a gift, a swap or for charity. This pattern is not intended for commercial use. Any intended commercial use requires permission in writing.


4 stitch markers
6mm 80cm circular
6mm DPNs
Waste yarn
Stitch holder
Darning needle
A button
pm – place marker
kfb – knit front and back
slm – slip marker
yo – yarn over
m1 – make one stitch
CO 28 stitches using the circular needle.
 Row 6: purl across.
Continue repeating rows 5 and 6 until there are 40 stitches between the2nd and 3rd markers (across the back)
Row 2: Knit to first marker, slm, kfb, slip first stitch on right needle back to the left, place the next stitch on the right needle on a stitch holder placing the holder to the right side of the work, slip the first stitch back onto the right needle, knit to end
Knit 12 rounds
 sts)
sts)
 Finishing
Want one in a lighter yarn? Click here for the 8ply version.
This pattern is provided free for your own personal use. You may knit it for yourself, as a gift, a swap or for charity. This pattern is not intended for commercial use. Any intended commercial use requires permission in writing.