Firstly, let me philosophically point out that to me this is a jumper, certainly not a sweater. I am however pragmatic at heart and realise that many more people in the Internet world use the term "sweater" than they do "jumper" for such a garment. I know that the Aussies and Canoadians will cope! Flexible folk we colonists.
Anyways, back to the post at hand. I got halfway through a
seamless baby kimono and ran out of yarn. Given the current baby boom that seems to be on I thought I might start another whilst I waited for more yarn to arrive from
Jolly Jumbuck. I got a little ways into it and decided to formalise a mod that I had been thinking about for a little while - the Seamless Kimono Sweater - so here it is!
I have only written it in one size (approximately 3 -6 months) but there may be more sizes to come as people get back to me regarding the resizing I have done on the kimono pattern. This version is knit in Moda Vera Merinos Fine 100% and some very cheap Sullivan's baby yarn.
If you are interested.....
Seamless Kimono Sweater
Requirements:
100g (230 – 250 m) 8 ply yarn
4 stitch markers
4mm 80cm circular
4mm 40cm circular
4mm DPNs
Waste yarn
Stitch holder
Darning needle
For embellishments (if required)
Approximately 10 g (much less than a ball) of 4ply yarn
2.75 mm DPN’s
OR
1m of Ribbon
Gauge: 22sts / 10cm
Size: 3 – 6 months
For additional sizes click here
Glossary
pm – place marker
kfb – knit front and back
slm – slip marker
yo – yarn over
Body
CO 34 stitches using the 80cm circular needle.
Row 1: kfb, pm, kfb, k4, kfb, pm, kfb, k18, kfb, pm, kfb, k4, kfb, pm, kfb
You have now created the right front, right sleeve, back, left sleeve and left front between the markers.
Row 2: purl across
Row 3: k1, yo, kfb, slm, kfb, k6, kfb, slm, kfb, k20, kfb, slm, kfb, k6, kfb, slm, kfb, yo, k1
Row 4: purl across
Row 5: k1, yo, knit to stitch before next marker, kfb, slm , kfb, knit to stitch before next marker, kfb, slm, , kfb, knit to stitch before next marker, kfb, slm, , kfb, knit to stitch before next marker, kfb, slm, kfb, knit to second last stitch, yo, k1.
Row 6: purl across.
Continue repeating rows 5 and 6 until there are 50 stitches between the2nd and 3rd markers (across the back)
 Create the sleeves: k1, yo, k to first marker, place the sleeve stitches onto waste yarn, pm, knit back stitches, place the other sleeve stitches onto waste yarn, pm, knit to last stitch, yo, k1
Next row: purl across
The body:
Row 1: k1, yo, knit to second last stitch, yo, k1
Row 2: purl across
Continue repeating rows 1 and 2 until there are 32 stitches on both front panels (the sections outside of the markers).
Using the 40cm circular begin knitting the next row stopping 14 stitches from the end of the row. Bring the other end of the 40cm circular in front of the remaining 14 sts on the 80cm circular, knit one stitch from either needle together until all stitches are joined in the round. Knit to the left hand side marker. This is now designated the start of the round
Next round: knit all stitches
Eyelet round (if desired): *k2, yo, k2tog* repeat for entire round
Knit a further 27 rounds.
Body Bottom
Round 1: knit to 4 stitches before second marker, p4
Round 2: p4, knit to 4 stitches before marker, p8, knit remaining stitches
Round 3: knit to 4 stitches before second marker, p4
Round 4: p4, knit to 4 stitches before marker, p8, knit remaining stitches
Round 5: knit to first marker, turn
Next row: knit back to marker, turn
From this point both the front and the back are worked back and forth.
Knit 4 rows of front, BO loosely
With right side facing, rejoin yarn to back, knit 6 rows, BO loosely.
Sleeves
Evenly space the sleeve stitches on 3 DPNs.
With the right side facing, locate the centre bottom of the sleeve opening. Pick up two stitches from the left of the opening and continue knitting the round, picking up two additional stitches onto needle 3
Knit 35 more rounds
Alternate purl one round, knit the next for next 4 rounds.
BO loosely
Finishing
Weave in ends.
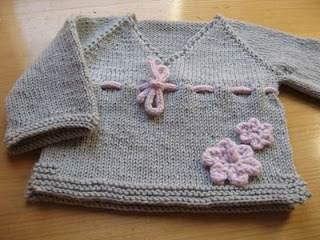
To end up with a sweater exactly as shown you need to create two flowers as follows:
CO 36sts.
k1, BO4, [k2, BO4] repeat until 1 st remains, K1 and thread yarn through remaining 12 stitches and pull tight. Thanks to Kath at http://kathok-knitting.blogspot.com/ for the flower instructions.
The larger flower is worked with the 4ply double stranded on 4mm needles, the smaller flower uses the 4 ply and the 2.75 mm needles.
Knit at least 70cm of I-cord using the 4ply and the 2.75mm needles and thread it through the eyelets. Alternatively you could use ribbon or nothing.
Block finished item.
This pattern is provided free for your own personal use. You may knit it for yourself, as a gift, a swap or for charity. This pattern is not intended for commercial use. Any intended commercial use requires permission in writing.

 I have only written it in one size (approximately 3 -6 months) but there may be more sizes to come as people get back to me regarding the resizing I have done on the kimono pattern. This version is knit in Moda Vera Merinos Fine 100% and some very cheap Sullivan's baby yarn.

 Create the sleeves: k1, yo, k to first marker, place the sleeve stitches onto waste yarn, pm, knit back stitches, place the other sleeve stitches onto waste yarn, pm, knit to last stitch, yo, k1
26 comments:
So cute and adorable.
you clever little cookie, you!!
another fabulous looking baby top... congratulations :)
What a gorgeous little baby jumper! I'm halfway through my first one and I'm thoroughly enjoying it. Thank you for such a cute, easy to knit pattern :-)
Love it and a jumper indeed - think I will have to attempt a boyish one of these!
Very cute Jacki :) I'm having a go at a 0-3 month size one atm.
Have you thought of making this into a sweater dress. I think I'm going to have a go at one of these for DD by simply adding increases below the eyelet row.
Ha ha! I accidentally made the same sweater - I used your baby kimono, stopped 1/2 way and then did a band around the middle, like a big fat obi in seed stitch. I made the sleeves longer and am turning the hem instead of garter - to keep the attention on the obi. I've thought about carrying the main color further to make a dress, but I don't think I have enough yarn.
I love your pattern, it's super easy and easy to transform into everything else. Thanks for writing it out.
(If you want to see pics, I'll be posting them on RAV soon, I'm Chrisk)
Chris
this is sooo adorable! I was wondering about a newborn size...Any chance of writing it, or giving re-sizing tips?
I am in the process of resizing the seamless kimono pattern and when I have finished that, this one will be next.
That little pattern is absolutely darling!!!!!!!!!!!!! Just love it!! I too, am hoping for some bigger sizes,or tips on resizing! Thanks so much for the pattern! You are very talented!!
Cathy
Oh my gosh - how adorable. I hope you decide to do bigger sizes - my daughter just had a baby girl but it would be too small by the time fall rolls around and I sure don't have the skills to enlarge it. You did a great job!
That is just precious!! What a wonderful pattern!
:)
Any chance of you sizing this up to a 2-3yr old? please!
What Rachael said! I'd love to knit this for my 2.5 year old DD.
Gorgeous! You are so creative! I also need this for a 3 year old - so many people would appreciate this is a bigger size.
The pattern is available for purchase (A$4) sized from newborn to 6 years. Click the link on the sidebar.
love the seamless kimono sweater. Made one for my daughter to give at a baby shower. Added a simple bonnet and booties and a little knitted kitty. Enjoyed if very much. I am making another now for a shower gift I will attend next month. Thank you for sharing this pattern.
this is a great pattern - easy and quick! i made a few that i intend to donate to a charity sale, so thank you :)
if you're interested, pictures here: http://arslongavitabrevisblog.blogspot.com/
thanks again!
How about writing the instructions for an adult sized one? This is way too cute!
so lovely. I am knitting this for my little one
Hi
I'm late getting on the bandwagon here, but I wanted to say how much I love this pattern. It's really adorable...thanks for sharing!
Quick question: how important is getting gauge in this pattern? I've got 22 sts in 4" but only 29 rows. Can you suggest a way to add length as I go, or does it matter? Thanks in advance for any advice.
I just love this pattern. I am making one right now. Is it possible for me to translate your pattern into French so I can post it on my knitting blog?
The Guy Who Knits
Hello ,
I’m Barbara and I write from Milan, in Italy.
I follow your wonderful blog for some time, I am particularly interested the pattern that you published
The Pattern Holly's jacket
The Seamless Kimono Sweater
I ask permission to italian translation for make it known to my knit-friends for www.megghy.com
Naturally, I will send you PDF italian transalation for your use
In the transalation will insert the link to your blog and I will quote you as an author.
The italian translation of your pattern is solely for personal use, non-profit
Thank you very much for your permission.
Await your response .
I am very glad to have met you
Thanks
Barbara Ajroldi
Good morning,
our names are Giulietta Lorenzini and Marina Simone and we are the moderators of the world Knit of the Blue World Forum (http://www.megghy.com/forum/).
Some time ago one of the moderators of your forum, Mrs. Barbara Ajroldi, asked your permission to translate one of the models and to make this translation on available of the users of the forum.
This lady (Barbara) has now left our community and we would like to keep the model a vision of our users.
We ask if you could afford to leave the translation available to the members in our forum.
otherwise the translation of the model will be removed.
We greet you cordially.
Giulietta Lorenzini and Marina Simone
mondoblu@hotmail.com
Post a Comment