Firstly, let me philosophically point out that to me this is a jumper, certainly not a sweater. I am however pragmatic at heart and realise that many more people in the Internet world use the term "sweater" than they do "jumper" for such a garment. I know that the Aussies and Canoadians will cope! Flexible folk we colonists.
Anyways, back to the post at hand. I got halfway through a
seamless baby kimono and ran out of yarn. Given the current baby boom that seems to be on I thought I might start another whilst I waited for more yarn to arrive from
Jolly Jumbuck. I got a little ways into it and decided to formalise a mod that I had been thinking about for a little while - the Seamless Kimono Sweater - so here it is!
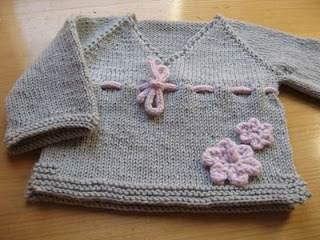
I have only written it in one size (approximately 3 -6 months) but there may be more sizes to come as people get back to me regarding the resizing I have done on the kimono pattern. This version is knit in Moda Vera Merinos Fine 100% and some very cheap Sullivan's baby yarn.
If you are interested.....
Seamless Kimono Sweater
Requirements:
100g (230 – 250 m) 8 ply yarn
4 stitch markers
4mm 80cm circular
4mm 40cm circular
4mm DPNs
Waste yarn
Stitch holder
Darning needle
For embellishments (if required)
Approximately 10 g (much less than a ball) of 4ply yarn
2.75 mm DPN’s
OR
1m of Ribbon
Gauge: 22sts / 10cm
Size: 3 – 6 months
For additional sizes click here
Glossary
pm – place marker
kfb – knit front and back
slm – slip marker
yo – yarn over
Body
CO 34 stitches using the 80cm circular needle.
Row 1: kfb, pm, kfb, k4, kfb, pm, kfb, k18, kfb, pm, kfb, k4, kfb, pm, kfb
You have now created the right front, right sleeve, back, left sleeve and left front between the markers.
Row 2: purl across
Row 3: k1, yo, kfb, slm, kfb, k6, kfb, slm, kfb, k20, kfb, slm, kfb, k6, kfb, slm, kfb, yo, k1
Row 4: purl across
Row 5: k1, yo, knit to stitch before next marker, kfb, slm , kfb, knit to stitch before next marker, kfb, slm, , kfb, knit to stitch before next marker, kfb, slm, , kfb, knit to stitch before next marker, kfb, slm, kfb, knit to second last stitch, yo, k1.
Row 6: purl across.
Continue repeating rows 5 and 6 until there are 50 stitches between the2nd and 3rd markers (across the back)
 Create the sleeves: k1, yo, k to first marker, place the sleeve stitches onto waste yarn, pm, knit back stitches, place the other sleeve stitches onto waste yarn, pm, knit to last stitch, yo, k1
Next row: purl across
The body:
Row 1: k1, yo, knit to second last stitch, yo, k1
Row 2: purl across
Continue repeating rows 1 and 2 until there are 32 stitches on both front panels (the sections outside of the markers).
Using the 40cm circular begin knitting the next row stopping 14 stitches from the end of the row. Bring the other end of the 40cm circular in front of the remaining 14 sts on the 80cm circular, knit one stitch from either needle together until all stitches are joined in the round. Knit to the left hand side marker. This is now designated the start of the round
Next round: knit all stitches
Eyelet round (if desired): *k2, yo, k2tog* repeat for entire round
Knit a further 27 rounds.
Body Bottom
Round 1: knit to 4 stitches before second marker, p4
Round 2: p4, knit to 4 stitches before marker, p8, knit remaining stitches
Round 3: knit to 4 stitches before second marker, p4
Round 4: p4, knit to 4 stitches before marker, p8, knit remaining stitches
Round 5: knit to first marker, turn
Next row: knit back to marker, turn
From this point both the front and the back are worked back and forth.
Knit 4 rows of front, BO loosely
With right side facing, rejoin yarn to back, knit 6 rows, BO loosely.
Sleeves
Evenly space the sleeve stitches on 3 DPNs.
With the right side facing, locate the centre bottom of the sleeve opening. Pick up two stitches from the left of the opening and continue knitting the round, picking up two additional stitches onto needle 3
Knit 35 more rounds
Alternate purl one round, knit the next for next 4 rounds.
BO loosely
Finishing
Weave in ends.
To end up with a sweater exactly as shown you need to create two flowers as follows:
CO 36sts.
k1, BO4, [k2, BO4] repeat until 1 st remains, K1 and thread yarn through remaining 12 stitches and pull tight. Thanks to Kath at http://kathok-knitting.blogspot.com/ for the flower instructions.
The larger flower is worked with the 4ply double stranded on 4mm needles, the smaller flower uses the 4 ply and the 2.75 mm needles.
Knit at least 70cm of I-cord using the 4ply and the 2.75mm needles and thread it through the eyelets. Alternatively you could use ribbon or nothing.
Block finished item.
This pattern is provided free for your own personal use. You may knit it for yourself, as a gift, a swap or for charity. This pattern is not intended for commercial use. Any intended commercial use requires permission in writing.



 Round 5: *k3, p2tog, k2, yf, k3, yf, k2, p2tog, k6* repeat to end of round


